


Not too long ago we featured a Queen for a Day chaircover for mothers’ day and it got me thinking…my daughter’s 40th birthday is coming up and she will be going away with her husband and close friends to celebrate. So, I wanted to make something she could take with her to let her know we are celebrating with her in spirit and to have something that would make her feel special on her big day. The chaircover was the perfect solution. I am also thinking of making a “King for the Day”, for Fathers’ Day and maybe a special one for birthdays, and of course, we can’t leave out our newly engaged couples – Queen for a Day and King for a Day chaircovers for baby showers, bridal showers and engagement parties – what a fun tradition to start. Just like everyone has their own stockings for Christmas, everyone can have their own special chaircover for their big day, whatever it is. So here is my spin on the mothers’ day chaircover we posted in May that used a pillowcase as the base for the chaircover.
“Made for a Queen (or a King)”, Celebration Chaircover
HERE’S WHAT YOU’LL NEED
- 1 yd. fabric* (or 1 pillow case)
- 1/2 yd. trim fabric*
- 1/2 yd. white fabric
- Thread
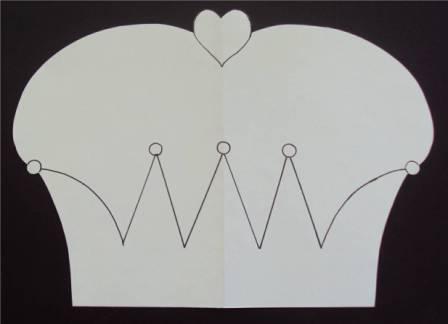
- Transfer crown pattern
- Jewel’s, sequins or charms
- Scissors or Rotary cutter*
- Fabric pens, permanent markers*
- Fabric glue
- Ruler
- Tape
- Iron
Chair backs are all different sizes, this cover should fit most all chairs as it is a bit longer than the average chair. If you want to make it to fit a particular chair, measure the back of the chair first and adjust the fabric length accordingly.
HERE’S HOW TO MAKE IT
- Cut 2- 20″ x 26″ pieces of fabric for body of cover. Cut 2- 3″ x 28″ & 3″ x 27″ strips of boarder fabric. Cut 2- 12″ x 1 1/2″ & 2- 13″ x 1 1/2″ & 1-3″ x 20″ strips for crown boarder. Cut 1- 10″ x 13″ of white fabric for crown transfer.
- Print out and tape down crown pattern to a table. Center 10″ x 13″ white square of fabric over pattern and tape down to hold in place while tracing crown pattern with black markers.
- Decorate crown to your liking. You can use different colored permanent markers to outline the inside lines of the crown as I did, use a stencil to trace the letters in the crown and glue on embellishments. Glue on embellishments last, so they don’t get in the way while you are sewing.
- Pin right sides together and sew the 12″ x 1 1/2″ & 13″ x 1 1/2″ trim pieces around white crown fabric.
- Iron & fold over so there is a 1/2″ boarder on both sides.
- Pin and sew crown square to 1 ply of fabric, 6″ down from the top and 3″ in from the sides.
- Pin and sew strips of boarder fabric, right sides together, to back piece of 20″ x 26″ piece of fabric. Fold up and iron bottom strip and sew. Finished boarder should be 1″ wide. Top stitch edge of boarder.
- Pin and sew the other bottom boarder strip to the remaining 20″ x 26″ piece of fabric, same way as above.
- Fold over and iron all edges of boarder fabric.
- Lay crown top fabric onto back, matching up all sides, wrong sides together. Fold over, Iron and pin boarder to front panel. Finished boarder should be 1″ wide. Top stitch boarder on all 3 sides. Finished size 21″ x 27″.
- Place a piece of card board or magazine inside and under the crown fabric square and glue on your embellishment to crown. Let dry.
*Products Used: Fiskers 45mm Rotary Cutter. Opaque Pigment Markers by Sakura. Fabric, Tidings & Tales by J. Wecker-Frisch and Adventures in Wonderland by Windham Fabrics.
By: YLE Crafty Chic, Sharon Tittle


